Tuesday, July 24, 2012

THE VEGGIE SITUATION

Zucchini and Brussels sprouts in front of a trellis of cukes and beans

     One consolation for the brutally hot weather is that summer vegetables are rushing to fruition. My spinach is by now ancient history, but my snow peas -- also a spring crop -- are still producing even as the vines begin to wither. In another week I will have to pull them up, chop them up, and toss them into my compost drum. My drum, by the way, is now empty.

     The only place I voluntarily use landscape cloth is on pathways in my vegetable garden between raised beds. At the end of the season I roll the pieces up and put them in our 1915 playhouse for the winter. I use them over and over until they develop too many holes to function.

Neighborhood cat finds shade between
rows of 6 foot tomato cages on newly replaced
landscape cloth.
    Because of weeding and rain run-off,  the paths slowly develop their own layer of silt on top that then generates more weeds. About this time of year I pull the landscape cloth up, dump out my compost, and spread it along the pathways. Then I put the cloth strips back down on top. My early batch of compost can now decompose in peace while I start a new batch.

     I harvested my big broccoli stalks long ago, but the plants keep producing smaller heads and I keep harvesting. And now, at last, the heat has begun to produce our first cukes and tomatoes. The grape and cherry tomatoes started to redden first, followed by some plum and now my first Early Girls. I always plant a number of varieties to extend the harvest time and to guard against disease and the  weather vagaries of each season. I also move both the tomatoes and the nitrogen-rich snow peas around in the garden from one year to the next.

     Parsley and basil are waiting  to mix with the cukes and tomatoes. We have already made a huge batch of pesto sauce to divide into one-dinner portions and put into the freezer. We have also used the parsley to make several batches of tabbouleh and chimichurri sauce.

     Bringing up the rear, as usual, are our beans. they will take the place of the snow peas on our table or the rest of the summer.

Broccoli with hot peppers and tomato cages behind.
     Removing my snow peas will leave an entire row in the garden empty. But I plan to remedy that in a couple of weeks, when I will plant a fall crop. Snow peas are a "cool weather" crop, but my spring crop lasted until mid-July, so I am hoping to keep an August seeding alive for a few scorching weeks in order to get a second crop before the first hard freeze.  This is always a bit of a gamble, but I only gamble with relatively cheap seeds, or, even better, left-overs from the spring planting. I may also stagger my planting  by planting a second batch of seeds two weeks after the first to even out the risk of an August Hades or an early freeze. This year I am betting on a late freeze and lots of snow peas, as well as more spinach.

     These, along with the parsley, broccoli, and Brussels sprouts, should keep the garden cooking past the first light snow.

Our Romano bean tee-pee.


Monday, July 9, 2012

WATER!


     I took  a quick inspection tour of some of my clients' yards today and discovered that we are all a bit slow to recognize just how dry we have been this year....and our plants are showing it.


     You will remember our wimpy winter when we were enjoying our lowest heating bills in years and saw cobwebs on our snow shovels. No snow! And remember the bulbs that started to pop up in December?


     Our winter was followed by the warmest spring in 142 years. Warm and sunny. We have had a rain deficit every month of the year. The worst deficit so far came in June, when our precipitation was only 40% of normal.


     And now we have had a heat wave worse than the last big one in 1995. Today's forecast says that once more "Sunny Days Are Here Again"  for at least the next week.


     We are used to having to water the lawn and our annuals in summer. But this time around we should be devoting a lot of attention to the trees and shrubs we usually take for granted. Most of them are in trouble. Don't bother to use a sprinkler. Just run the hose up near a tree and turn it on to a good trickle. then leave it there for a few hours before moving to the next one. A long, deep watering should be good for at least a week.


     Meanwhile, let's hear it for the climate-change deniers. I was born in North Carolina and have an old friend who lives near the shore. Walking barefoot on a North Carolina beach has long been one of my retirement fantasies. But I recently discovered an alarming fact:


     Most coastal states, seeing the glaciers melting, have begun studies and contingency plans for what they will face as the sea level rises. Not so my fellow Tar Heels, however. The same citizens who brought us Jesse Helms have also produced a remarkable state legislature. Like King Canute of old, it has decreed that the seas will not rise -- and has prohibited any steps to prepare for the consequences.


     Chicago is looking better and better. Let's keep our trees and shrubs alive and well.


Sunday, June 24, 2012

COMPOSTING FOR LAZY PEOPLE


     Books have been written on the art and science of composting: correct mixture of wet and dry ingredients, how to get the optimum temperature, worms vs no worms -- the number of topics and debates is endless. I will probably get back to this down the road. Today, however, I am writing only for lazy people like me. We want to contribute to the environment, but not if it saddles us with a second job.

     Most of us have heard the basic rules of composting: don't put any animal material in your compost and do not add any weeds. Compost needs air, but not too much air; it needs to be damp, but not wet, and it needs to be stirred around regularly. To this I would add a major rule: make it easy on yourself. Make composting easy enough and convenient enough that you might be able to convince a teenager to do it. You can always get more ambitious later. At the beginning the key thing is consistency and the formation of habitual practices.

     The first way to make things easy is to limit the material available for your compost pile. If you have a lawn, the use of a self-mulching mower is a must. It is senseless to throw lawn clippings into a compost bin when they can go directly back into the ground. I also use my mower to mulch up all my fall leaves. I blow them out of my beds into the yard where the mower can reach them. then I blow most of  the shreds back into the beds. This works even on the tough old oak leaves I have-- eventually. Meanwhile I have shredded leaves available to add to my compost whenever it gets soggy.

     Once you mulch your grass and tree leaves, most of your potential compost material is gone. What is left is mainly from perennials you have pruned and kitchen scraps. We use our garbage disposal in the sink only during the winter. The rest of the year we compost every vegetable and fruit that is peeled, trimmed or squeezed. We have a kitchen composter next to the sink to make this easy. It is just a crock large enough to fit a lunch bag. It has a lid with holes in the top and a removable handle. When it is full, I take it out the back door and add it to my compost. The bag helps everything slip right out. If it is still in good shape it gets re-used. If not, it gets dumped into the compost with everything else, and I put in a new bag.

     If my kitchen composter breaks I will try to get a new one. But any ceramic pot that holds about 1/2 gallon will do. A lid is not really necessary other than for aesthetic reasons.

     I am also partial to compost barrels with a crank for rotation like the one in the picture. These cost more than other compost devices, but for me convenience trumps all. What good does a cheap compost device do you if you have given up using it after two weeks? The barrel does not create a blight in your yard either, so it does not have to be banished to some Siberia in the far corner of your back yard. I keep mine close to the back door so that my trips with the kitchen composter will be as short as possible. When you are working in the yard already the composter can be used anywhere. To really use all your kitchen waste, however, you better make that trip easy and keep your barrel close.

     My crock fills up every two or three days. It is simple to get it to my compost drum all of ten feet from the bottom step of my back porch. I open the hatch, dump the crock, replace the hatch, and turn the crank a couple of times and head back in. I can even brave the 95 degree heat for the five minutes it takes to do this and run back inside. AND by making regular trips with my kitchen scraps I also make sure that the compost is turned regularly -- something all of us are prone to forget.

     To keep things easy do not worry about all the science stuff that I mentioned at the beginning, like the temperature of the pile. These questions are fun, but they are all about making the composting process more efficient. I don't make my living delivering compost, so I don't care how efficient my compost barrel is, as long as it works. I DO care about how efficient I am as I compost on the fly. Without grass clippings to fill it up, my composter seems to be a bottomless pit. I keep tossing stuff in, but it never fills up. "What never?"  "Well, hardly ever." I dump my barrel into my vegetable garden twice a year -- the last time just before the first hard freeze. And I dump everything out -- even the things put in two days ago. It will be tilled into the soil as soon as I get around to it -- maybe not until next spring.

     If after a year or so you decide you are more ambitious than I am, the first step would be to buy another drum just like the first one. This doubles your capacity, but it does something better as well. It allows you to reserve one composter for finishing off the composting process while you add new material to the other. If you are still going after two years, you will be telling me how to improve. My only claim to virtue is that I have kept at it for 10 years. So it can't be that hard, right?

Sunday, May 27, 2012

More Soil Amendments


     My apologies. I have been AWOL for some time now. At the end of April my father died after a long illness. As his oldest son and de facto guardian in recent years, it fell to me to organize his departure, and I was absent for almost 10 days. Many joined together to celebrate his life. Now it is time to return to ours.

     I left in the middle of talking about soil amendments and the importance of adding organic matter to the soil. Today I want to focus on PH. In addition to being heavy clay, our local soil is also naturally alkaline. For the prairie plants native to this area, this is no problem. For many others, however, including many ordinary vegetables, a less alkaline soil would be welcome.

     For many evergreens and for plants that like shade, alkaline soil is inhospitable. They are used to a shady spot in a forest rich in organic matter - especially the acidic droppings of pines and other trees.

     This means that we gardeners should skew our soil amendments toward the acid side. We want our vegetable gardens to have a neutral PH -- about 7.0. If we are planting hollies, rhododendron, or many hydrangea, we want our soil on the acid side of neutral. If you have evergreens or hydrangea whose leaves seem to be abnormally yellow, that is an indication of chlorosis -- an affliction caused by soil that is too alkaline.

     In the city our naturally alkaline soil is accentuated by things like tuck pointing that add yet more lime to the soil and thus increase the alkalinity.

     For those who have established beds, you should use whatever is available to increase the acidity of your soil. The simplest of these is to throw your coffee grounds into your plant beds. A simple crock in the kitchen can store up several days worth of coffee grounds until you have the energy to take them outside.

     For problem areas, or for new beds you should include, in addition to compost, lots of peat moss ( which is acidic) and a teaspoon of soil sulfur for each plant. The sulfur should be mixed into the area below the plant. You do not want to let the plant roots be burned by direct contact with the sulfur.

     The Beverly area in Chicago is particularly shady. For those of us who live there, these recommendations are especially relevent. If you are going to plant a new bed, you have a wonderful opportunity to provide an environment that your plants will love for years. If you already have established beds, bit by bit amendments will also help. Scatch in a bit of soil sulfur around your hollies or hydrangeas every spring. Use some peat moss a a mulch, and make use of your coffee grounds.

Thursday, April 19, 2012

Compost


     I think I have huffed and puffed about pruning long enough for one season. Besides, it is now that time of year where I am too busy to think, let alone opine in public.


     We have now passed the average last frost date in our area, and that means all but the most tender stuff can be planted without a lot of worry. It is like playing the black at roulette now, without any of the anxiety involved with playing a number. So all of us with cabin fever want to get out there and start new life in the plant kingdom.


     Part of my job is to try to convince you to put off that exciting planting day and do boring stuff instead. Especially if you are planting an entire bed, this is a once in a lifetime opportunity to improve your soil without tearing up all your plant roots.


     The soil around Chicago, at least on the Illinois side, is some of the best anywhere, provided some construction crew has not destroyed it. But is has two features that make it less than perfect: it is a heavy clay and it tends to be alkaline. Native plants have no problem with this, but many other plants do, including vegetables.


     The first and central amendment that everyone can use is compost. It is almost impossible to put too much compost in your yard. In fact, if you ever have to fill a low spot, please do not ever add "topsoil." Most commercial topsoil has been sifted through a screen to remove rocks and twigs and to make it soft and crumbly. But it only takes a couple of rains and a few footsteps for it to turn into that same old clay we know and love. Instead, get a blend of topsoil and compost...and then add more compost on top. With all that organic matter, you should expect the soil to settle a bit over time, so spread it slightly higher than you want it to end up.


     Compost breaks down over time and adds nutrients to the planting zone, as well as providing a good environment for all sorts of beneficial organisms in the soil. With enough compost added, you will not have to use commercial fertilizer at all.


     Moreover, all those bits and pieces create little voids around them that allow air and water to penetrate the clay and improves drainage as well as allowing more nutrients to reach plant roots.


     I can pontificate on this subject as much as on pruning. But if the clients now waiting  for me  caught me spending too much time scribbling,  their patience would evaporate, and I would be in big trouble.

Sunday, April 8, 2012

THINNING WHERE IT IS THICK

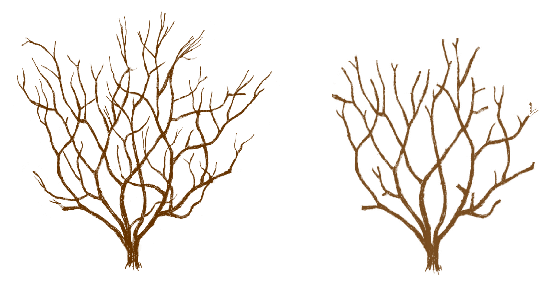
Now you can see that the pruning here is more elaborate than simply cutting stems off at the ground.
   
    To pick up where we left off, if you cut 1/4 of your stems to the ground each spring, four years from now you will end up with a shrub whose effective age is 4 years, rather than 40. If I could figure out a way to do that for people I would have my own full-time gardener and condos on at least three continents.


     For those of us with over-sized shrubs, however, more may be needed. In addition to cutting older stems to the ground, you need to down-size the stems you keep. For trees and single stem shrubs, that is your only route.


     Before I wax mystical on you, we can start with a few guidelines:


     First, decide how low you want the shrub to become and cut everything off that is higher than, say, six feet. Then trim off  the sides where they hang over the sidewalk or run into other plants. This is your "butcher's cut." Or, if you want to be more artsy, it is the first block cut of a sculptor -- who may see a masterpiece within, but the rest of us just see a rough cube of stone. The practical thing here is that you have removed enough to see how the plant has been growing and what you will need to do.


     Second, start second and third cuts. As a rough way to start, make your second cuts 6" lower than your block cut and your third cut 12" lower. You end up with a shrub that has one third of its branches at three different levels. And you have punctured that dense shell at the top that prevents sun from reaching lower leaves.


     Third, with your second cut I hope you will start noticing how your plant grows. It is time to start looking seriously at what you are doing. Many shrubs, for example, tend to send up 4-5 branchlets where they were cut before. Some shrubs, like burning bushes and many viburnums, have enlarged nodes from which these branchlets protrude. So alter the 6", 12" scheme to fit the node. Make one of your cuts a cut that cuts below these nodes. Instant thinning. It does not matter where it is the first, second, or third cut, as long as you get the size you want.


     Now for the more mystical part.The 0, 6,12 rule and the cut below the node rule are just a rough start. Part of what they do is get you close enough to your plant to begin to understand it. As you are snipping you should also be looking at how it has grown. To the extent you understand the growth, you can begin to intervene in a way that helps the plant do what it wants to do, rather than imposing your will on it.


     The key thing here is to look at how branches form and how buds grow. Your general rules need to be modified to cut, where possible, to an already existing branch. If that is not possible, go for a bud. But not any bud. Look for one that seem to be going in the direction you want  - not straight up, not straight down, not back to the center, but angled in the direction you hope it will go.


     If this all sounds a bit intimidating, I apologize. Gardening is supposed to be relaxing, right? So do the 1/4 thinning from the ground first and follow the 0,6,12 rule. That is enough for the first year. Next year you can look at the results and come up with a more sophisticated approach. And if you make a mistake, don't worry about it. Plants face far worse enemies than you and they will survive your errors. And eventually they will be glad you are around.


     One of my favorite clients told me that pruning is now one of her best therapies for purging the frustrations of a trying day. Soon you will be able to join her.


     Third

Monday, April 2, 2012

Thinning Shrubs vs. Shearing

Many experts advocate removing 1/3 of the stems. I will jump for joy if you remove 1/4.

     Those who have been using hedge clippers for a number of years may have noticed something: no matter what you do, your shrubs keep getting larger. And while the outer shell stays nice and green, there is less and less below and inside. This is a result of unrelieved shearing without thinning.


     When you cut off the end of a branch most plants will grow two or more new tips to replace the old one, and the leaves become more dense. Within limits this is a good thing -- especially in shady areas where plants tend to open up.


     But repeated shearings make the outer shell too dense. The leaves on the top and sides block sun and air from the interior and the branches there die back. The effect is even worse when you have pruned in the notorious "W" shape that I mentioned earlier. Now you have an overhang that cuts even more sun from the plant's lower limbs.


     Even in formal gardens regular shearing needs to supplemented with thinning to allow sun and air to get to the interior of the plant.


     And here we come to my Number One Pruning Rule for multi-stemmed shrubs. It is simple, it is easy, and almost no one does it. Every spring you should cut up to 25% of your stems to the ground. If this sounds too scary, cut down one or two this year. When you notice in July that you can't tell the difference, you will be bolder next spring.


     You should go after the largest, oldest stems first, then stems that are going in a direction you do not like or ones that cross through the plant and rub against other branches. By doing this you accomplish four things:


     1. You open up the plant to more air and sun.


     2. You improve the shape of the plant by getting rid of stray and crossing stems.


     3. You rejuvenate the plant as old weary stems are replaced by new ones.


     4. You help control the plant's size because the oldest stems are the tallest and thickest and the most difficult to trim at the top. 


     I'll talk about pruning the the upper parts of shrubs next time.